
Integrating Spokestack in Android

Using voice as an interface can be a daunting proposition. First, you have to be able to actually process voice as input. Then, you have to decide what to do with that input. You probably want to deliver responses via voice too. After all that, you still have to decide how to integrate the voice interface with your touch interface.
If you’re here, you probably know that the Spokestack library helps you with the first three of those challenges. With Spokestack Tray, you’ll also have an answer for the last one.
What is it?
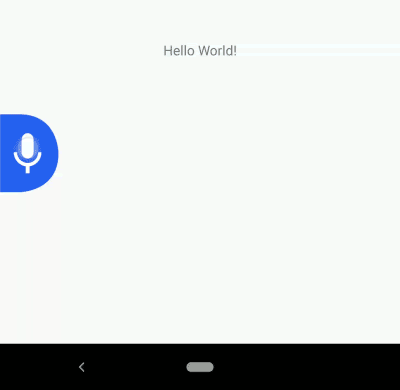
We created Spokestack Tray to give developers a full-featured visual UI to reflect an app’s voice interactions with the user. At first glance, it’s just a microphone button that sits on the side of the screen. When the user taps the button (or says the wake word), it opens up into a full tray that displays the user’s speech as well as system responses, reading those responses aloud as it displays them.
How do I use it?
First, add the dependency to your app’s build.gradle:
dependencies {
  // ...
  implementation 'io.spokestack:tray:0.4.4'
}
The tray is implemented as a Fragment, so to include it, add this to your activity’s layout.xml:
  <!-- nested in the main layout, after other views/sublayouts -->

  <include
    android:id="@+id/tray_fragment"
    layout="@layout/spokestack_tray_fragment"
/>Note: Depending on your app layout, you may also have to add android:clipChildren="false" to the fragment’s parent layout(s) to avoid the microphone tab disappearing as the tray opens.
Then make your activity itself extend TrayActivity (a subclass of AppCompatActivity), implement the methods it requires, and the library will take care of the rest. Voice interaction will be handled by the Tray, which you’ll have access to via an instance variable named tray that’s initialized during onStart.
You’ll need an ID and secret key from your Spokestack account in order to set up the TrayConfig that TrayActivity requires.
If you’d prefer to do the setup yourself, here’s a sample that doesn’t use TrayActivity, and demonstrates a minimal complete TrayConfig as well:
import io.spokestack.tray.*

class MyActivity : AppCompatActivity(), SpokestackTrayListener {

  lateinit var tray: SpokestackTray

  // ...

  override fun onCreate(savedInstanceState: Bundle?) {
    val config = getConfig()
    supportFragmentManager.fragmentFactory = SpokestackTrayFactory(config)

    // note that the factory is instantiated and set on the manager BEFORE calling
    // `super.onCreate()`
    super.onCreate(savedInstanceState)
  }

  private fun getConfig() {
    return TrayConfig.Builder()
      // credentials from your Spokestack account
      .credentials("spokestack-client-id", "spokestack-secret-key")
      .wakewordModelURL("https://path-to-wakeword-models")
      .nluURL("https://path-to-nlu-files")
      // note the implementation of `SpokestackTrayListener` in the class declaration
      .withListener(this)
      // optional builder customization; see the documentation for more details...
      .build()
  }

  override fun onStart() {
    // set the value of the lateinit `tray` var
    tray = SpokestackTray.getInstance(config)
    super.onStart()
  }
When you download Spokestack wake word or NLU models, you’ll have several URLs to different files. wakewordModelURL and nluURL above only require the path to the relevant directory, not full file URLs. So for the demo “Spokestack” wake word, set wakewordModelURL to ”https://d3dmqd7cy685il.cloudfront.net/model/wake/spokestack/”.
The Tray is designed for seamless use across activities — for example, to allow a user to continue giving a voice command while the app switches activities — so its state is stored outside the fragment itself and survives fragment destruction. If your app needs to release resources held by the Tray and its underlying Spokestack instance, call the tray’s stop() method. If you then need to re-enable voice control before the current Tray fragment instance is destroyed, you must call start().
If you want to keep tray state intact after process death, you can store it in its parent activity’s onSaveInstanceState and onRestoreInstanceState methods using the Tray’s getState() and loadState() methods; see their documentation for more details.
Responses
Chances are that if you’re allowing the user to talk to your app, you want the app to talk back. Tray is integrated with Spokestack’s TTS service, so synthesizing audio is just as easy as transcribing it.
When you extend TrayActivity, one of the methods you’ll have to implement is getTrayListener(), which creates and returns a SpokestackTrayListener. This interface assists your app in reacting to events received and produced by the Tray. Because each use case is unique, all its methods are optional; the one we’re interested in here is onClassification. This method is called after a user’s speech has been transcribed by ASR and classified by NLU. It supplies your app with the NLU result and asks you to return a response:
override fun onClassification(result: NLUResult): VoicePrompt {
  return if (result.intent == "your-special-intent") {
    VoicePrompt("I hear you loud and clear")
  } else {
  VoicePrompt(
    "Sorry; I didn't catch that",
    expectFollowup = true)
  }
}
The optional second parameter in the VoicePrompt constructor lets the Tray know if you’re expecting a response — if you are, it will resume active listening after your prompt is played so the user doesn’t have to use the wake word or a button for each interaction.
Configuration
The above sample will get you up and running with minimal fuss, but it’s far from all that Spokestack Tray offers. When you’re building a TrayConfig instance, you can choose to configure and provide the underlying Spokestack builder itself. This will let you do things like change ASR providers, set up custom listeners for events from individual systems, and add custom speech processing components if you need to. You can read about the Spokestack builder here.
There are also a range of options that are applicable to the Tray itself, accessible via helper methods on the TrayConfig.Builder instance. See the documentation for more details, specifically the documentation on TrayConfig.Builder.
Conclusion
We hope this brief introduction to Spokestack Tray has inspired thought about what your app could do with voice control. With Tray, experimenting with this exciting interface takes just a few lines of code. See the README for more details about the Tray and the customization options available. If you need help, please open a GitHub issue or check out one of our multiple support channels.
Originally posted December 17, 2020