Getting Started
This guide will get you up and running with Spokestack for Node — you’ll have a voice interface in your software in no time.
Installation
$ npm install spokestack --saveFeatures
Spokestack has all the tools you need to build amazing user experiences for speech. Here are some of the features included in node-spokestack:
Automatic Speech Recognition (ASR)
We provide multiple ways to hook up either Spokestack ASR or Google Cloud Speech to your node/express server, including asr functions for one-off ASR requests and websocket server integrations for ASR streaming. Or, use the ASR services directly for more advanced integrations.
Text-to-Speech (TTS)
Through the use of our GraphQL API (see below), Spokestack offers multiple ways to generate voice audio from text. Send raw text, speech markdown, or SSML and get back a URL for audio to play in the browser.
Wake word and Keyword Recognition
Wake word and keyword recognition are supported through the use of our speech pipeline (see startPipeline). One of the most powerful features we provide is the ability to define and train custom wake word and keyword models directly on spokestack.io. When training is finished, we host the model files for you on a CDN. Pass the CDN URLs to startPipeline() and the Speech Pipeline will start listening These same models can be used in spokestack-python, spokestack-android, spokestack-ios, and react-native-spokestack. The pipeline uses a web worker in the browser to keep all of the speech processing off the main thread so your UI never gets blocked. NOTE: The speech pipeline (specifically tensorflow’s webgl backend) currently only works in Blink browsers (Chrome, Edge, Opera, Vivaldi, Brave, and most Android browsers) as it requires the use of the experimental OffscreenCanvas API. Firefox is close to full support for that API, and we’ll look into supporting Firefox when that’s available.
Natural Language Understanding (NLU)
The GraphQL API (see below) also provides a way to convert the text from ASR to actionable “intents”, or functions that apps can understand. For instance, if a user says, “Find a recipe for chocolate cake”, an NLU might return a “SEARCH_RECIPE” intent. To use the NLU, you’ll need an NLU model. While we have plans to release an NLU editor, the best way right now to create an NLU model is to use Alexa, DialogFlow, or Jovo and upload the exported model to your Spokestack account. We support exports from all of those platforms.
node-spokestack includes an example app that demonstrates ASR, speech-to-text, and wake word and keyword processing. It also includes a route for viewing live docs (or “introspection”) of the Spokestack API (/graphql).
Usage
The GraphQL API (TTS and NLU)
Text-to-Speech and Natural Language Understanding are available through Spokestack’s GraphQL API, which is available at https://api.spokestack.io/v1. It requires Spokestack credentials to access (creating an account is quick and free).
To use the GraphQL API, node-spokestack includes Express middleware to help integrate a proxy into any node/express server. A proxy is necessary to avoid exposing your Spokestack credentials.
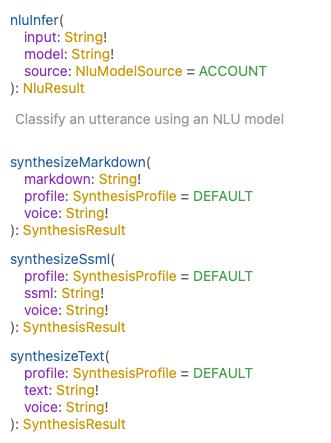
Synthesize text-to-speech using various methods including raw text, speech markdown, and SSML.
Note: The voice argument for all three TTS queries may be changed if you have created a custom voice using a Spokestack Maker account (use the string from your voice’s “name” field). Otherwise, Spokestack’s Free “demo-male” voice is used.
It can also be used for NLU classification.
Automatic Speech Recognition (ASR)
ASR is accomplished through the use of a websocket (rather than GraphQL). node-spokestack includes functions to use either Spokestack ASR or Google Cloud Speech, and there are two functions for each platform.
- A helper function for adding a websocket to a node server (express or otherwise). This is the main way to use ASR.
- A function for processing speech into text in one-off requests. This is useful if you have all of the speech up-front.
Using Google ASR instead of Spokestack ASR
If you’d prefer to use Google ASR, follow these instructions for setting up Google Cloud Speech. Ensure GOOGLE_APPLICATION_CREDENTIALS is set in your environment, and then use the googleASR and googleASRSocketServer functions instead of their Spokestack equivalents.
Wake Word and Keyword (Speech Pipeline)
The speech pipeline uses a custom build of Tensorflow JS in a Web Worker to process speech. It notifies the user when something matches the specified wake word or keyword models. The main function for this is the startPipeline() function. To use startPipeline(), you’ll need to serve the web worker from your node/express server. Our example next.js app demonstrates how you might accomplish this in express:
app.use(
  '/spokestack-web-worker.js',
  express.static('./node_modules/spokestack/dist/spokestack-web-worker.min.js')
)
With these made available to your front-end, the speech pipeline can be started.
Another option is to copy the file from node_modules to your static/public folder during your build process.
// In package.json
"scripts": {
  // ...
  "copy:spokestack": "cp node_modules/spokestack/dist/spokestack-web-worker.min.js public/spokestack-web-worker.js",
  "build": "npm run copy:spokestack && next build"
}
Setup
First, create an account. Then, create an API token. Note that you’ll only be able to see the token secret once. If you accidentally leave the page, create another token. Once you have a token, set the following environment variables in your .bash_profile or .zshenv:
export SS_API_CLIENT_ID=#"Identity" field from Spokestack API token
export SS_API_CLIENT_SECRET=#"Secret key" field from Spokestack API token
Convenience functions for Node.js servers
See the extensive server documentation on Github!
Convenience functions for the client
See the extensive client documentation on Github!
